Lijit Search Wijit

c) A Rahmanto - Bandung 2011. Powered by Blogger.

Terpopuler

AddThis

Make Your Domain


Kolom Tukeran Link
Ayo belajar blog dan berbagi ilmu bersama X-Pose Blogger, jika Anda punya tips/trik yang lebih menarik silahkan kirim artikel...
Your Posting

Nama
Email
Website
Kategori
Judul Posting
Isi Posting
Upload Gambar
Pernah diposkan di Blog/Site
Kalau sudah pernah, sebutkan nama site dan kapan ditayangkan
Terima kasih atas partisipasi anda memberikan artikel kepada kami
Showing posts with label Tips Blogger. Show all posts

Friday, April 1, 2011

14 Tips to Improve Your Article Writing and Article Marketing

Everything online requires content, and articles are just one form of content. Learning how to write articles and create content should be a focal point for anyone looking to start a business or even a hobby online, after all like the saying goes, content is king.
Here are some tips to help you write better articles:
1. Write with an end goal in mind. Different types of articles work for different reasons. If you are looking for syndication and publication on authority websites, you’re not going to want short, full of fluff 300 word articles. Instead, you’ll want to go with long informative 800-1000 word articles that actually deliver quality information on your topic, in a format that works well for ezine and authority publishers.
2. Do your research beforehand. The better you know the topic, the easier it will be to write for it. Simply by knowing your topic, you can drastically cut down on the time it takes to create informative articles your readers will enjoy. Attempt to comprehend your topic, before you sit down to write.
3. Just write. The more you write, the better you will get at it. And not just on your topic. Challenge yourself. Write on anything and everything, and your overall writing skills will improve, not to mention your typing speed. Both things will help you reduce writing time in the long end.
4. Write with the reader in mind. Instead of writing for your own purpose, think about it from the readers perspective. What is the reason they are reading your article? Are you addressing their needs and concerns? If you can get into the mind of your reader and what they are seeking from you and your writing, you’ll be better equipped to write an article they will appreciate.

5. If you are writing for back links, keywords matter.
If you are writing for readers, forget about them. Keywords only help you get found in the search engines. If you are preparing high quality articles for syndication, you’ll get the readers from the sites you are published to. That’s not to say you want to go completely off topic, simply that keywords aren’t vital, and if you are writing on topic anyways, the search engines will figure out where you belong in their search results. As Google recommends, create your content for your reader, to improve your chances of ranking well in Google. In my articles, I have found that to be true.
6. Learn to craft captivating titles. Titles are one of the most important parts of the article marketing and writing battle. It doesn’t matter how informative or well written your article is, if the title doesn’t make readers open the article. Spend some time on your title. Actually focus on making it reader friendly and interesting. Your bottom line will thank you for this.
7. Write with passion. If you are bored to tears by your topic, chances are your writing is going to reflect your boredom, be dry and present less than glamorous prose. If you are in love with your topic, it will shine through your words and come across to the reader. This is one reason many suggest when you are just getting started to go with a passion. It is much simpler to write about something that you get emotional about, than to write about something you have no emotional investment in.
8. Don’t proof read and spell check as your write. Stopping and changing your mind frame from creation to editing can interrupt your flow of thought. Instead focus on getting the thoughts and ideas down, and then go back and do the spelling and grammar checks. You’ll find your mind thinks and writes that much quicker by using this method.
9. Focus on quality. There will forever be the debate over quality and quantity. Few take into consideration that quality will naturally breed quantity, through syndication and other methods. If you are consistently providing high quality articles, publishers will love utilizing your content and do so on a regular basis. And the more publishers that take notice of your work, the more targeted traffic you will be getting. Much more targeted traffic then that coming from article directories and other such places.
10. Turn off your word count tool. Stop checking the word count and simply write until the idea has been fully explained to the reader. If that takes 300 words so be it. If it takes 1000, then let it. Stopping the flow of ideas simply to stay in line with a word count is a sure fire way to leave your articles lacking that finished feel.
11. Read. Yes, read. The more you read and the more you expand your horizons, the better your writing will be. Simply taking in the written word, exploring and understanding other writing methods and formations will help you in your own writing. It can also help you increase your vocabulary and find styles that really reach out and grab readers by the eyeballs.
12. Check out what the competition is doing, and do it better. If your competition is providing lackluster articles, that barely wet your taste for the subject, go above and beyond, and your readers will notice. By knowing what kind of content you are trying to compete with, you can improve your own skills and marketing mindset.
13. Use the language of your target audience. If you are writing for highly educated people, your writing should reflect that. If you are writing for mass appeal, stick to relatively lower level writing, think grade 8 levels. If a grade 8 student could read and interpret what you are saying, you have succeeded. If they cannot, you may want to revise your writing style and language.
14. Understand that writing is a skill. And as such, needs to be constantly worked upon. Malcolm Gladwell stated in “Outliers” it takes 10,000 hours to master something. Master writing by continually working on it and the improvement of your skills. And by the time you reach 10,000 hours of work, you’ll have mastered the skill and no longer need others tips and technique to make your writing vibrant and a success.
Hopefully these tips will help you master article writing and marketing. In the end, all that matters is that you actually do it. No amount of tips or tricks are going to help you if you don’t just get started and get that writing underway. Begin writing and over time your skills and abilities will improve, and your writing will reflect your growing knowledge and skills. Writing starts the same way for everyone, with a blank page waiting to be filled. Get started filling yours today.

From : www.sitepronews.com
Continue Reading »

Friday, March 25, 2011

Cara Posting Kode HTML


Untuk menulis suatu kode HTML dalam postingan kita tidak bisa asal tulis saja. Jika hal itu dilakukan maka yang akan keluar adalah hasil dari eksekusi kode HTML nya.
Untuk itu anda perlu mengkonversi (encode) kode HTML yang dimaksud.

Caranya:
1. Siapkan kode HTML yang akan diposting
2. Masuk ke situs encode online disini
3. Paste kode HTML disana dan klik encode (kalau decode mengembalikan kembali)
4. Setelah selesai di encode, Copy paste dalam postingan anda.
5. Selesai.

Demikian semoga bermanfaat dan salam sukses


Kilik Online-Bandung Indonesia
Continue Reading »

Wednesday, March 23, 2011

Cara Mendaftarkan Blog/Website di Search Engine Google dan Yahoo

tujuan membuat blog adalah agar apa yang kita tulis bisa di baca oleh orang lain. semakin banyak pengunjung atau pembaca di blog kita apalagi memberikan komentar atas tulisan kita pasti sangat menyenangkan.

kabar buruknya tidak dengan begitu saja blog kita bisa cepat di kenal orang, memerlukan usaha keras untuk mengenalkan blog kita ke orang lain.

banyak cara yang bisa dilakukan agar blog kita cepat di kenal orang atau pengunjung, seperti blogwalking atau berkunjung ke blog orang lain, dan cara yang paling efektif adalah dengan mendaftarkan blog anda ke mesin pencari (search engine). mesin pencari sangat banyak macamnya, tapi kita bisa mendaftarkan ke search engine yang paling banyak di kenal oleh para pengunjung saja. seperti Google, Yahoo!, MSN dan lainnya.

bagaimana cara daftarnya,,,silahkan baca artikel ini...

Daftar ke Google
cara daftar ke google, silahkan masuk ke http://www.google.com/addurl/,

kemudian islah form yang tersedia
  • URL ; isi dengan alamat url blog anda
  • Comments ; Isikan keyword atau kata kunci yang berhubungan dengan blog anda
  • masukan huruf Verifikasi ke kotak dibawahnya.
  • klik tombol Add URL
  • Selesai.
google memerlukan waktu 3-4 minggu untuk bisa menampilkan blog anda di mesin pencari. jika sudah lewat dari waktu tadi, coba ketik alamat blog anda ke mesin pencari google? jika sudah,,,selamat blog anda sudah masuk daftar google. tapi jika belum tunggu beberapa minggu lagi,,,bila masih belum muncul juga anda bisa coba daftarkan lagi seperti langkah di atas.

Daftar ke Yahoo!

Untuk mendaftar ke yahoo! kunjungi http://id.search.yahoo.com/info/submit.html untuk bisa mendaftar ke yahoo anda harus mempuyai account yahoo, jika belum punya silahkan buat dulu disini.

bagi yang sudah anda tinggal login ke yahoo
anda bisa membuka dari url diatas atau pada bagian bawah halaman awal yahoo klik kirimkan situs anda.
  • pada halaman selanjutnya klik Submit Your Site for Free:
  • pilih Kirim Situs Web atau Halaman Web
  • masukkan alamat url blog anda, klik tombol kirim URL
  • selesai.

Daftar ke Msn

untuk daftar ke Msn, silahkan masuk http://search.msn.com/docs/submit.aspx?FORM=WSDD2

kalo sudah masukan huruf verifikasi pada kotak di bawahnya.
lalu masukkan alamat url blog anda klik tombol submit URL
selesai

jika ingin blog anda cepat terindeks oleh puluhan mesin pencari, and abisa menggunakan situs-situs submitter. silahkna klik banner di bawah atau pada bagian sidebar dari blog saya,,,,

cara sangat mudah anda tinggal masukan url blog dan alamat email anda kemudian klik Submit Your Site

sudahkan blog anda terindeks oleh mesin pencari
Continue Reading »

Cara Setting pada Domain Co.Cc

Untuk membuat web site atau situs anda harus mempunyai 2 komponen utama yaitu domain dan web hosting. Seperti yang di ulas pada postingan :
Cara Membuat Situs dan Websites
Berikut langkah langkah untuk set up domain co.cc. Dengan menggunakan web hosting gratis 000webhost :
1. Klik banner dibawah ini untuk Log in atau sign up pada co.cc. Untuk mendapakan nama domain co.cc.
CO.CC:Free Domain
2. Masuk menu Domain setting seperti pada gambar di bawah.
Setup domain  co cc
3. Kemudian klik manage domain , disitu tertera nama domain yang anda miliki. Setelah itu klik name server dns untuk setup DNS. Pada menu Manage DNS anda anda isi :
Bila anda menggunakan webhosting Gratis ooowebhost.com isikan :
  • name server1 : ns01.000webhost.com
  • name server2 : ns02.000webhost.com
Bila anda menggunakan ESC-webhosting.co.cc isikan :
  • Name Server 1 : ns1.esc-webhosting.co.cc
  • Name Server 2 : ns2.esc-webhosting.co.cc
Seting domain co cc
4. Klik setup
5. Abaikan menu lainya bila anda tidak mengetahui fungsinya. Selesailah pengaturan DNS “Domain co.cc” anda. Set up akan berfungsi maksimal 2 X 24 jam
Mudah bukan .? Berkreasilah dengan situs buatan anda sendiri, silahkan anda mencoba !!!!!.
Update :
Klik di sini Info Baru Domain Gratis Alternatif Free Domain CZ.CC

Fasilitas Domain co.cc kembali bisa anda dapatkan secara gratis termasuk perpanjangan atau renewal domain tahun berikutnya.
BARU : Mulai Awal 2009 ini Gunakan fasilitas Webhosting Gratis ESC-WebHosting untuk Kebutuhan Webhosting anda
Continue Reading »

Saturday, March 19, 2011

Cara Membuat Page Elemen TAB VIEW

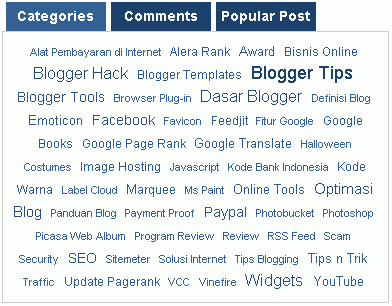
Berhubung cukup banyak yang bertanya kesaya mengenai cara membuat widget tab view yang ada categories, comment dan popular post seperti di blog ini. Maka pada kesempatan ini, saya akan mencoba untuk menjelaskannya dipostingan ini. Maka saya akan menjelaskan caranya disini.

Agar to the point, saya akan memberikan tutor tentang cara membuat widget tab view seperti yang ada diblog ini yaitu berisi Categories, Comment, dan Popular Post.

tab view, label cloud
Ok mari kita mulai.

1. Buka Blogger -> Design -> Edit HTML

2. Backup template anda terlebih dahulu untuk mengantisipasi terjadi kegagalan. Setelah itu beri tanda centang pada Expand Widget Templates.

3. Letakkan kode berikut diatas kode ]]></b:skin>

#labelCloud {text-align:center;font-family:arial,sans-serif; line-height:23px}
#labelCloud .label-cloud li{display:inline; background-image:none !important; padding-left:1px; margin:0px; vertical-align:baseline !important; border:0 !important;}
#labelCloud ul{list-style-type:none; margin:0 auto; padding:0px;}
#labelCloud a img{border:0; display:inline; margin:3px; padding:0px}
#labelCloud a{text-decoration:none}
#labelCloud a:hover{text-decoration:underline}
#labelCloud li a{}
#labelCloud .label-cloud {}
#labelCloud .label-count {padding-left:0.2em; font-size:9px; color:#000}
#labelCloud .label-cloud li:before{content:&quot;&quot; !important}
4. Lalu letakkan kode dibawah ini diatas kode </head>

<script type='text/javascript'>
// Label Cloud User Variables
var cloudMin = 1;
var maxFontSize = 18;
var maxColor = [28,66,109];
var minFontSize = 11;
var minColor = [51,97,148];
var lcShowCount = false;
</script>
5. Kemudian cari kode yang dibawah ini. (Pastikan anda telah memasang widget label diblog anda. Jika tidak, anda tidak akan menemukan kode dibawah ini)

<b:widget id='Label1' locked='false' title='Labels' type='Label'>
<b:includable id='main'>
<b:if cond='data:title'>
<h2><data:title/></h2>
</b:if>
<div class='widget-content'>
<ul>
<b:loop values='data:labels' var='label'>
<li>
<b:if cond='data:blog.url == data:label.url'>
<data:label.name/>
<b:else/>
<a expr:href='data:label.url'><data:label.name/></a>
</b:if>
(<data:label.count/>)
</li>
</b:loop>
</ul>

<b:include name='quickedit'/>
</div>
</b:includable>
</b:widget>

6. Kalau sudah ketemu, ganti kode diatas dengan kode dibawah ini

<b:widget id='Label1' locked='false' title='Label Cloud' type='Label'>
<b:includable id='main'>
<b:if cond='data:title'>
<h2><data:title/></h2>
</b:if>

<div class='widget-content'>
<div id='labelCloud'/>
<script type='text/javascript'>

function s(a,b,i,x){
if(a&gt;b){
var m=(a-b)/Math.log(x),v=a-Math.floor(Math.log(i)*m)
}
else{
var m=(b-a)/Math.log(x),v=Math.floor(Math.log(i)*m+a)
}
return v
}

var c=[];
var labelCount = new Array();
var ts = new Object;
<b:loop values='data:labels' var='label'>
var theName = &quot;<data:label.name/>&quot;;
ts[theName] = <data:label.count/>;
</b:loop>

for (t in ts){
if (!labelCount[ts[t]]){
labelCount[ts[t]] = new Array(ts[t])
}
}
var ta=cloudMin-1;
tz = labelCount.length - cloudMin;
lc2 = document.getElementById('labelCloud');
ul = document.createElement('ul');
ul.className = 'label-cloud';
for(var t in ts){
if(ts[t] &lt; cloudMin){
continue;
}
for (var i=0;3 &gt; i;i++) {
c[i]=s(minColor[i],maxColor[i],ts[t]-ta,tz)
}
var fs = s(minFontSize,maxFontSize,ts[t]-ta,tz);
li = document.createElement('li');
li.style.fontSize = fs+'px';
li.style.lineHeight = '1';
a = document.createElement('a');
a.title = ts[t]+' Posts in '+t;
a.style.color = 'rgb('+c[0]+','+c[1]+','+c[2]+')';
a.href = '/search/label/'+encodeURIComponent(t);
if (lcShowCount){
span = document.createElement('span');
span.innerHTML = '('+ts[t]+') ';
span.className = 'label-count';
a.appendChild(document.createTextNode(t));
li.appendChild(a);
li.appendChild(span);
}
else {
a.appendChild(document.createTextNode(t));
li.appendChild(a);
}
ul.appendChild(li);
abnk = document.createTextNode(' ');
ul.appendChild(abnk);
}
lc2.appendChild(ul);
</script>

<noscript>
<ul>
<b:loop values='data:labels' var='label'>
<li>
<b:if cond='data:blog.url == data:label.url'>
<data:label.name/>
<b:else/>
<a expr:href='data:label.url'><data:label.name/></a>
</b:if>
(<data:label.count/>)
</li>
</b:loop>
</ul>
</noscript>
<b:include name='quickedit'/>
</div>

</b:includable>
</b:widget>
7. Jika sudah. Klik Save Template lalu masuk ke menu Design -> Page Element

8. Klik Add a gadget -> HTML/Javascript lalu masukkan script dibawah ini kedalamnya

<style type="text/css">
div.TabView div.Tabs
{
height: 30px;
overflow: hidden;
}
div.TabView div.Tabs a
{
float: left;
display: block;
width: 100px;
text-align: center;
margin: 0px 0px 0px 3px;
background-color: #1c426d;
height: 24px;
padding-top: 6px;
vertical-align: middle;
border: 1px solid #ffffff;
border-bottom-width: 2;
text-decoration: none;
font-family: "Arial, Helvetica, sans-serif", Arial;
font-weight: 900;
color: #000;
}
div.TabView div.Tabs a:hover, div.TabView div.Tabs a.Active
{
background-color: #336194;
}
div.TabView div.Pages
{
clear: both;
border: 1px solid #cccccc;
overflow: hidden;
background-color: #ffffff;
}
div.TabView div.Pages div.Page
{
height: 100%;
padding: 5px;
overflow: hidden;
}
div.TabView div.Pages div.Page div.Pad
{
padding: 3px 5px;
}

</style>


<form action="tabview.html" method="get">
<div id="TabView" class="TabView">
<div style="width: 385px;" class="Tabs">
<a><span style="gt;Categories</span></a>
<a><span style="gt;Comments</span></a>
<a><span style="gt;Popular Post</span></a>
</div>
<div style="width: 385px; height: 270px;" class="Pages">

<div class="Page">
<div class="Pad">
<div id="labelCloud"/>
<script type="text/javascript">

function s(a,b,i,x){
if(a&gt;b){
var m=(a-b)/Math.log(x),v=a-Math.floor(Math.log(i)*m)
}
else{
var m=(b-a)/Math.log(x),v=Math.floor(Math.log(i)*m+a)
}
return v
}


var c=[];
var labelCount = new Array();
var ts = new Object;
<b:loop var="label" values="data:labels">
var theName = &quot;<data:label.name/>&quot;;
ts[theName] = <data:label.count/>;
</b:loop>

for (t in ts){
if (!labelCount[ts[t]]){
labelCount[ts[t]] = new Array(ts[t])
}
}
var ta=cloudMin-1;
tz = labelCount.length - cloudMin;
lc2 = document.getElementById(&#39;labelCloud&#39;);
ul = document.createElement(&#39;ul&#39;);
ul.className = &#39;label-cloud&#39;;
for(var t in ts){
if(ts[t] &lt; cloudMin){
continue;
}
for (var i=0;3 &gt; i;i++) {
c[i]=s(minColor[i],maxColor[i],ts[t]-ta,tz)
}
var fs = s(minFontSize,maxFontSize,ts[t]-ta,tz);
li = document.createElement(&#39;li&#39;);
li.style.fontSize = fs+&#39;px&#39;;
li.style.lineHeight = &#39;1&#39;;
a = document.createElement(&#39;a&#39;);
a.title = ts[t]+&#39; Posts in &#39;+t;
a.style.color = &#39;rgb(&#39;+c[0]+&#39;,&#39;+c[1]+&#39;,&#39;+c[2]+&#39;)&#39;;
a.href = &#39;/search/label/&#39;+encodeURIComponent(t);
if (lcShowCount){
span = document.createElement(&#39;span&#39;);
span.innerHTML = &#39;(&#39;+ts[t]+&#39;) &#39;;
span.className = &#39;label-count&#39;;
a.appendChild(document.createTextNode(t));
li.appendChild(a);
li.appendChild(span);
}
else {
a.appendChild(document.createTextNode(t));
li.appendChild(a);
}
ul.appendChild(li);
abnk = document.createTextNode(&#39; &#39;);
ul.appendChild(abnk);
}
lc2.appendChild(ul);
</script>

<noscript>
<ul>
<b:loop var="label" values="data:labels">
<li>
<b:if cond="data:blog.url == data:label.url">
<data:label.name/>
<b:else/>
<a expr:href="data:label.url"><data:label.name/></data:label.name></a>
</b:else></data:label.name></b:if>
(<data:label.count/>)
</data:label.count></li>
</b:loop>
</ul>
</noscript>
</div>
</div>
</div>

<div class="Page">
<div class="Pad">
<script style="text/javascript" src="http://hermanblog.googlecode.com/files/recent-comments.js"></script><script style="text/javascript">var a_rc=10;var m_rc=false;var n_rc=true;var o_rc=40;</script><script src="http://hermanblog.com/feeds/comments/default?alt=json-in-script&callback=showrecentcomments"></script>
</div>
</div>

<div class="Page">
<div class="Pad">
<script type="text/javascript">
function pipeCallback(obj) { document.write('<ol style="text-transform: capitalize;">'); var i; for (i = 0; i < obj.count ; i++) { var href = "'" + obj.value.items[i].link + "'"; var item = "<li>" + "<a href=" + href + ">" + obj.value.items[i].title + "</a> </li>"; document.write(item); } document.write('</ol>'); } </script> <script src="http://pipes.yahoo.com/pipes/pipe.run?_render=json&_callback=pipeCallback&_id=1a1c6e4e6d4f148e3650fda46910e15f&url=http%3A%2F%2Fhermanblog.com&num=10" type="text/javascript"></script> <noscript><a href="http://hermanblog.com" target="_blank">Herman Blog</a></noscript>

</div>
</div>

</div></div></form>

<script style="text/javascript" src="http://hermanblog.googlecode.com/files/tab_view.js"></script>

<script type="text/javascript">tabview_initialize('TabView');
</script>
Keterangan:
Teks berwarna merah adalah kode untuk label cloud alias Categories, teks berwarna orange adalah kode untuk recent comment alias Comment, dan teks berwarna cokelat adalah kode untuk popular post alias Popular Post. Silahkan diganti kodenya jika anda ingin memasang widget lain.
Teks berwarna hijau adalah nama dari masing-masing tab. Silahkan diganti sesuai dengan nama widget yang anda pasang
Teks berwarna ungu bold adalah ukuran wigdet tab view. Silahkan diganti sesuai ukuran sidebar blog anda.

9. Kalau sudah Klik Save.

10. Masih pada halaman Page Element, klik Edit pada Label.

label

11. Hapus tulisan yang ada dalam kotak Title (bila ada) lalu klik Save.

12. Selesai. Silahkan klik View blog untu melihat hasilnya.


Untuk keterangan mengenai cara mengganti warna, font, ukuran dari widget tab view dan label cloud.

Selamat mencoba.
Continue Reading »

Bagaimana kode HTML untuk Warna

Kumpulan kode warna HTML - tool yang satu ini merupakan salah satu dari berbagai macam tool yang mendukung kegiatan blogging kita. Sebelumnya, saya pernah memosting kumpulan kode warna juga, namun...banyak yang bilang kalau kode warnanya nggak lengkap. Ya sudah, agar teman-teman Blogger merasa lebih nyaman berada di blog ini, mungkin tool kode warna HTML yang satu ini bisa membantu teman-teman yang lagi mencari kode warna lebih lengkap lagi.

Jika kumpulan kode warna HTML berikut tidak muncul, itu artinya di komputer anda belum terinstall flash, segera install flash. Dan jika merasa kesulitan, silahkan untuk mencoba kumpulan kode warna lainnya_


KUMPULAN KODE WARNA 1
(Silahkan untuk mengklik warna yang anda inginkan, dan kodenya akan muncul di bagian kanan atau kolom hex)


KUMPULAN KODE WARNA 2
(Nah ini kumpulan kode warna yang muter2, seperti di atas, klik aja yang mana anda inginkan. Selanjutnya kodenya akan tampil di sebelah kanan, kode yang tampil dari hasil klik adlh kode yang satu spesies warnanya. Silahkan pilih warna mana yang paling cocok dengan yg anda inginkan. Dah, segitu aja yo_)


Semoga bermanfaat^
Continue Reading »

Cara Mendaftarkan Blog ke Mesin Engine

Banyak cara yang bisa kita lakukan agar blog kita bisa dikenal dan di kunjungi, antara lain adalah dengan rajinnya kita blogwalking atau berkunjung ke blog milik orang lain, mendaftarkan ke berbagai agregator, dan yang paling efektif adalah melalui search engine atau mesin pencari.
Bagi blogger pemula mungkin berangggapan bahwa apabila kita membuat website atau blog akan secara otomatis terindeks atau berada pada list berbagai search engine, dan kenyataannya tidaklah demikian. Seperti halnya sebuah sekolah, agar nama kita terdaftar pada buku daftar siswa, tentunya kita harus melakukan pendaftaran terlebih dahulu ke sekolah tersebut. Sama halnya dengan mesin pencari, agar blog kita terindeks pada mesin pencari, maka kita harus terlebih dahulu mendaftarkan blog milik kita pada situs pemilik mesin pencari.

Mesin pencari tentu jumlahnya sangat banyak sekali, dan pada saat ini yang paling terkenal di dunia adalah Google, Yahoo, serta Msn. Apabila blog kita ingin terindeks pada mesin pencari mereka, maka kewajiban kita adalah mendaftarkan URL blog kita pada mesin pencari mereka. Bila ada yang belum tahu ke manakah harus mendaftarkan blognya, maka silahkan simak tulisan berikut :


  • Daftar GoogleUntuk mendaftar ke google, silahkan sobat kunjungi http://www.google.com/addurl/, nah apabila sudah berada pada halaman pendaftaran ada beberapa langkah yang harus di lakukan, yaitu mengisi form yang di sediakan :


  • URL –> Isi dengan URL blog sobat.


  • Comments –> Isi dengan keyword atau kata kunci yang berhubungan dengan blog sobat


  • Isi kotak kosong dengan huruf Verifikasi yang tersedia


  • Klik tombol Add URL


  • Selesai.Setelah sobat melakukan pendaftaran ke Google, maka tidak serta merta blog sobat terindeks pada mesin pencari nya, akan tetapi memerlukan 3 sampai 4 minggu baru blog sobat bisa terindeks. Jika sudah 3 sampai 4 minggu, maka cobalah ketik alamat blog sobat pada mesin pencari google, apakah sudah terindeks atau belum? jika belum, coba tunggu beberapa minggu lagi, dan tuliskan kembali alamat blog sobat, Jika ternyata masih belum juga, coba deh daftarin lagi blog nya ke google seperti langkah di atas. Atau mungkin sobat tidak sabar ingin cepat terindeks, sebenarnya bisa saja ini terjadi, hanya dalam 3 atau 4 hari saja blog sobat sudah bisa terindeks di google. Ingin tahu caranya? simak saja postingan berikutnya ya, mungkin satu dua hari ke depan artikelnya selesai saya buat.


  • Daftar Yahoo!Untuk mendaftar ke yahoo! silahkan sobat kunjungi https://siteexplorer.search.yahoo.com/submit. Akan tetapi untuk mendaftar ke yahoo, sobat harus terlebih dahulu mempunyai account yahoo, karena di perlukan log in terlebih dahulu ke account yahoo. Bagi yang belum punya account yahoo (email di yahoo) silahkan bikin dulu, bagi yang sudah punya, sobat tinggal login dengan username serta password sobat. Apabila sudah login, nanti sudah tersedia kolom untuk di isi, silahkan isi kolom tersebut dengan URL sobat, kemudian klik tombol Add URL, selesai. Jika ingin memasukan alamat feed sekalian, sobat bisa memasukannya. Ingat, alamat feed di blogger hanya tinggal menambahkan atom.xml di belakang uRL blog sobat, contoh : untuk blog saya ini mempunyai alamat feed sebagai berikut : http://Merito.wordpress.com.com/atom.xml
    atau memakai www pun sama saja :
    http://www.merito.wordpress.com/atom.xml


  • Daftar ke MsnUntuk daftar ke Msn, silahkan sobat kunjungi http://search.msn.com/docs/submit.aspx?FORM=WSDD2 silahkan sobat isi huruf verifikasi dan URL sobat pada kotak yang tersedia, kemudian klik tombol Submit URL, selesai. Apabila sobat mempunyai keinginan lebih, yaitu URL blog sobat terindeks pada puluhan mesin pencari, sobat bisa menggunakan bantuan situs submitter. Coba klik saja banner dibawah ini :
    Submit Your Site To The Web's Top 50 Search Engines for Free!
    Tugas sobat hanya mengisi alamat URL blog miliknya, serta menuliskan alamat email saja, kemudian klik tombol Submit Your Site.
    Jika ingin lebih cepat terkenal coba lakukan ping ke bebagai agregator, silahkan klik banner di bawah :
    pingoat_9.gif
    Sobat tinggal mengisi form yang di sediakan.


  • Continue Reading »